Introduction
Bonsai Adenium is a popular indoor plant for its beauty and elegance. Curving a bonsai Adenium can be a delicate but rewarding technique that gives it an artistic and unique form. In this guide, we will explain step by step how to bend your Bonsai Adenium successfully.
Steps to follow:
- Step 1: Preparation of equipment
- Step 2: Tree evaluation
- Step 3: Curve branches
- Step 4: Fastening of curved branches
- Step 5: Post-curvature care
Step 1: Equipment Preparation
Before you begin to bend your Bonsai Adenium, make sure you have at hand the necessary material: bonsai threads, scissors, ligature thread, a cutter and fasteners.
Step 2: Tree Evaluation
Watch carefully your Bonsai Adenium to spot the branches you want to bend. Choose healthy, flexible branches that can withstand curvature without breaking.
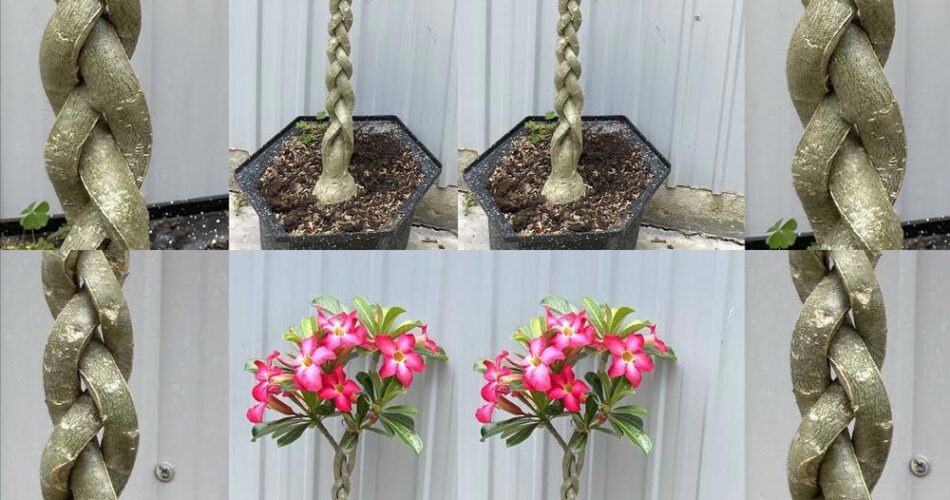
Step 3: Curve branches
Gently use bonsai yarns to bend the selected branches in the desired direction. Make sure you do not exert excessive pressure to avoid damage to the tree. Proceed gradually and carefully.
Step 4: Attaching curved branches
Attach the curved branches with the ligature wire to keep them in their new position. Be careful not to tighten too hard not to hinder the flow of sap. Fasteners can also be useful in keeping the branches in place.
Step 5: Post-curvature care
After curving your bonsai Adenium, regularly monitor his progress. Make sure the branches are not too tight by the wires and adjust them if necessary. Provide your bonsai Adenium with the appropriate care in terms of water, light and nutrients to help adapt to its new form.
Conclusion
Running a bonsai Adenium is a technique that requires patience and precision, but can transform your plant into a living art work. By following this step by step guide, you will be able to bend your bonsai Adenium successfully and admire its new elegant and artistic look.